I don’t normally do numbered or bulleted lists, but here goes:
1. First select the paint color. (But of course this doesn’t take into account the fine art of negotiating with your significant other necessary to do that, or the hours, days or weeks that might be involved in said negotiation.)
2. Decide on the quality of paint you wish to use. (Here again some negotiation might be required. Is there a type or brand of paint that you particularly like to use? Is it more expensive than your partner wants, does it have low or no VOCs, what about odor, etc.)
3. Pick the finished surface (sheen). (You think semi-gloss makes sense in the bathroom but your partner likes flat. Get the picture?)
4. Figure out if you are going to paint the bathroom entirely with a brush or will you be using a roller (your partner thinks rollers are faster and you think brushes are neater requiring less cleaning up) and then buy all the necessary equipment and tools if you don’t all ready have them. Ideally, none of these negotiations should take place in the home improvement store you have decided to patronize (matronize?), but alas, that isn’t always an option.
5. Or you could decide to paint the bathroom entirely on your own and make all the decisions entirely on your own. This is always an option, but if your partner isn’t as easy going as mine, there might be trouble.
I am capable of linear thought, more or less. But I don’t think it always gets the job done as it should be done as you might have figured out from the above numbered list. So now, let me offer this:
In reality, there was never a question of who would be doing the painting of our bathroom. I’d all ready done the guest bathroom by myself (Bernd, my husband, works full time), decided I was happy with the color and the finish, and thought it would be a good color for our master bathroom. How did I pick the color originally? I looked at a couple of chips, said this looks nice and bought it, no fuss, no bother. My only concession to Bernd was that I would do it only when we were able to leave all the doors and windows open all day and all night.
We hadn’t quite reached that point with the weather when I just couldn’t stand it hanging over my head any more. And besides, I had started to ignore all the white spackling compound (necessitated by changing all the towel racks, light fixture and toilet paper holder) on our boringly off white walls. That was a sure sign that I had waited long enough and it was time to paint.
I don’t really much like painting. I especially dislike painting ceilings. I like preparing to paint less than painting, however. And cleaning up afterward … well let’s just say I don’t like it at all.
But good preparation is half the outcome. Make sure the walls are free of dust, lint, cat or dog hair, human hair, spider webs and the like. A Swiffer® floor cleaner works amazing well for that.
If you are not using a self-priming paint, you may have to wash any greasy or oily marks from the walls first as well. If the walls are really dirty, just wash them, it will save a lot of frustration later. Finally clean all the tops of door frames, shower or tub surrounds and the little teeny tiny ledge along the top of the base molding.
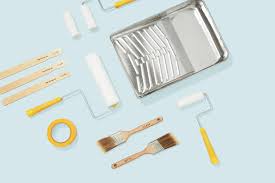
Remove all the switch plates and outlet covers. Please do not paint around them. That’s just tacky. Take down any lighting fixture covers and exhaust fan covers. Please don’t paint around them either. If you are not good with a brush, use the blue painter’s tape to mask any surfaces you do not want painted. Clear everything from the counter top and take the lid off of the toilet tank (I don’t much like painting around the toilet but it has to be done). Set out all your tools and supplies (did you remember a drop cloth?). If you did not buy the paint within a day or two of using it, stir it well. Now you are about ready to begin painting.
Open as many doors and windows as you can. Even if the day is a bit warmer (or cooler) than you might like this is still a good idea. The new paints on the market have low VOC’s (volatile organic compounds) but they are still not good for you over the long term. After I’ve painted, I usually have a very bad headache for several days. The faster the paint dries to the touch the better. The faster it cures … even better. Warmth and dry air are good for this. So try not to paint in the winter, or when the air is really humid. And keep in mind that paint doesn’t cure or stick well if it is applied at a temperature that is below 55 degrees Fahrenheit.
Don’t just start on the middle of the room willy-nilly. Think about it a bit first. Will your partner (if you have one) need to take a shower immediately upon getting home from work? If so, consider doing the area around, and the ceiling above, the shower first. Also, consider which parts you might come into contact with the most and consider doing them as early on as possible.
After doing the precision parts, paint around all the places where the towel bars and switch plates and the like go. Do not repaint those areas as you are filling in the entire wall. This way that paint dries sufficiently to replace the fixtures as soon as possible. I always like to do that when I’m all done because it looks so nice and I want to enjoy the fruits of my labor.
Even if you use a roller, which I don’t because I can’t seem to keep from making an abysmal mess when I do, you will have to use a brush around the door frames and on the inside corners. How steady are your hands and arms after you’ve been painting for a while? Mine get tired pretty fast so I do all the parts that require precision first. I know I mentioned using painter’s masking tape, but I just hate going to all that trouble. And truth be told, it never does perform as advertised; especially if your walls have a definite texture. So I just carefully paint around everything with a wide, but thin brush that tapers to a nice precise edge. The cheap brushes they sell for applying a sample color work well for that.
Are you planning on painting the ceiling? If so, this should be your next step. Painting the ceiling is back, neck and arm breaking work and so I get it out of the way while I’m still relatively fresh. After finishing the ceiling, it is a real treat to work on a wall.
A couple other tips:
1. Even if using a drop cloth, look down often. For sure there will be some patch of floor that isn’t covered by the cloth and the drips will be sure to find it.
2. Also look lower on the wall, sometimes the drip hits the wall and dries partially before you get to that section. It can be hard to get rid of that drip once it’s dried a bit.
3. When using a brush, never dip more that the first third of the brush in the paint. Actually, more like a quarter is better. Even if you are using high quality paint with lots of solids, as soon as you press the brush to a surface, the paint will start to squeeze out and drip. And if the paint works its way up to and under the ferrule, it will be very hard to clean completely. Paint that dries in the brush makes it difficult to use the brush again.
4. Move a freshly loaded brush slowly to avoid trails of paint splattering all over. A little patience while painting is rewarded in a lot less mess.
5. Watch where you step. Walking on a fresh drip and stepping off of the drop cloth can make a huge mess on your floor.
6. If you have decided to use a roller, more power to you. Be sure to put drop cloths on everything: over the toilet, on the counter top, etc. Rollers splatter paint everywhere. Wear a hat and safety goggles. If you normally wear eye glasses, be sure to wear an old pair. Also, you will need to buy a little more paint than recommended because the roller wastes so much of it. I will say this about rollers, they are good if your walls have a definite texture. For a lot of texture, get a roller with a lofty nap (wastes even more paint, though). Our walls have a lot of texture and I spent a lot of time brushing all sorts of directions to get it all covered (that was so not fun on the ceiling).
7. My general rule of thumb is that anything you set out to do will require three times as long to accomplish as you think it will so plan accordingly. I like to finish an area or a room in one day so that when it comes time to clean up, I only have to do it once.
8. When you are finished and have put everything back and have cleaned up all your tools, step back, take a good look at it and say, “Ahhhh. That looks so nice.” Then go take a nice, long, hot bath. Your back will thank you for it.


Leave a comment